Get help with your Acer Chromebook 511.
On this page:
Getting started
When you first turn on your new device, you may get a setup wizard to help you get started. Take a look at these steps to walk through the setup process if needed.
- Insert your active T-Mobile SIM card and charge the device.
- Turn on the device using the power button.
- A 'Welcome' screen will appear, select your language, select Let's go >.
- Select your Wi-Fi network, enter your network password if needed, select Connect.
- Review Google terms of service, select Accept and continue.
- Select Who's using this Chromebook? You, A child, Browse as Guest or Enterprise enrollment, select Next >.
- Sign in to your Chromebook with your primary Google Account (this account will be set as the owner and is the only account that will be able to change certain Chrome settings). If you don't have a Google account, select More options to create one or sign in with Enterprise enrollment.
- Select Next.
- Review your Chrome and Google services, select Accept and continue.
- Review Google Play Terms of Service, select More > Accept.
- Install apps from your other devices by selecting the apps, select Install & continue > or Skip to install at a later date, select Continue >.
- Access your Assistant with "Hey Google" select Next >, or Skip to set up at a later date, select Done >.
- Connect your phone to text from your computer, share your internet connection, reply to conversation notifications, and unlock your Chromebook with your phone, select Accept & continue or No thanks.
- Select Get started to start using your new device.
- Select the Time.
- Select your Network. Turn off Wi-Fi.
- From the list of available networks, select T-Mobile.
- Open a new tab in Chrome.
- Attempt to go to any website. You will be redirected to the T-Mobile activation page.
- Complete the online registration form.
- When T-Mobile service is activated you will get a confirmation page.
Settings & Tech Specs
There's a lot you can do with your new device.
Keys
The Chromebook uses function keys or key combinations to access some hardware and software controls, such as screen brightness and volume. The dedicated function keys each have a specific function.
| Icon | Function |
|---|---|
| Go to the previous page | |
| Go to the next page | |
 |
Reload the current page |
 |
Open the page in full-screen mode |
 |
Switch to the next window |
 |
Decrease screen brightness |
 |
Increase screen brightness |
 |
Search from the Apps panel |
Shortcuts
You can use shortcuts to complete some tasks more quickly.
| Keyboard shortcut | Function |
|---|---|
| Ctrl + |
Takes a screenshot |
| Alt + |
Toggles caps lock |
| Alt + |
Projects your screen |
| Ctrl + Alt + / | Get a complete list of keyboard shortcut |
Touchpad
The built-in touchpad is a pointing device that senses movement on its surface. This means the cursor responds as you move your fingers across the surface of the touchpad.
| Action | Gestures |
|---|---|
| Click | Press down on any part of the touchpad |
| Right-Click | Touch the touchpad with two fingers or press and hold Alt on the keyboard and tap the touchpad |
| Scroll | Place two fingers on the touchpad and move them up and down to scroll vertically or left and right to scroll horizontally |
| Drag and drop | Select the item you want to move with one finger. With a second finger, move the item. Release both fingers to drop the item (this gesture works with files, not windows or icons) |
Tech specs
| Type | Specification |
|---|---|
| Battery |
|
| Camera | 0.9MP front camera with 720p HD |
| Display |
|
| Keyboard | 74-/75-/78-key Acer FineTip EDU anchored keyboard with international language support |
| Dimensions |
|
| Memory |
|
| Operating System | Google Chrome |
| Processor | Qualcomm® Snapdragon™ 7c Compute Platform |
| Webcam |
|
| Graphics | Qualcomm® Adreno™ 618 GPU |
| Audio |
|
| Anti-theft | Yes |
| Advanced messaging | No |
| Device Unlock App | No |
| Emergency Alerts (WEA) | Review T-Mobile.com/WEA |
| Number Verified | No |
| SIM Card | Nano |
| System manager (Carrier IQ) | No |
| T-Mobile Video Calling | No |
| Connectivity |
|
| Network |
|
Battery, Memory, & Storage
Battery
This is a uni-body device with an internal battery that cannot be removed. If you need to soft reset the device, follow these steps:
- Select the Time > Settings.
- Select the Shut down icon.
- Wait 3 -5 seconds, use the Power button on the device keyboard to turn your device back on.
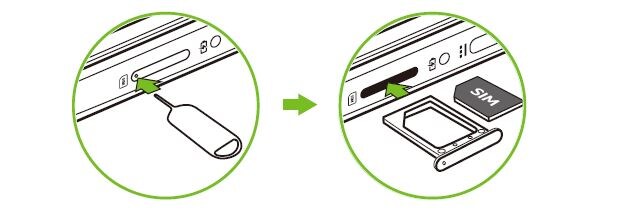
SIM card
This device supports a Nano size SIM card.
- Insert the SIM tray removal tool into the hole on the SIM card tray, and then push until the tray pops out.
- Place the SIM card on the tray making sure the gold contacts face down.
Connections & Network
Clear cache / cookies / history
- Select the Chrome browser icon.
- Select the Menu icon > Settings > Privacy and security.
- Select Clear browsing data. Make sure the following are checked.
- Browsing history
- Cookies and other site data
- Cached images and files
- Select Clear data.
Open / close tabs / windows
- From any web page, select the Menu icon.
- Select New tab.
Turn on / off
- Select the Chrome browser icon.
- Select the Menu icon > Settings > Site settings.
- Select JavaScript and select one of the following.
- Sites can use Javascript
- Don't allow sites to use JavascriAPN
APN & data settings
- Select the Time > Settings.
- In the Network section, select Mobile Data. This option is only available if a SIM card is inserted.
- Select the T-Mobile APN if one is available. If not, select a new APN.
- Verify and update the following settings for the Data APN if needed.
- Name: T-Mobile
- APN: Fast.t-mobile.com
- Proxy: <Not set>
- Port: <Not set>
- Username: <Not set>
- Password: <Not set>
- Server: <Not set>
- MMSC: http://mms.msg.eng.t-mobile.com/mms/wapenc
- MMS proxy: <Not set>
- MMS port: <Not set>
- MMS protocol: WAP 2.0
- MCC: 310
- MNC: 260
- Authentication Type: <Not set>
- APN Type: default,supl,mms
- APN Protocol: IPv4/IPv6
- APN roaming protocol: IPv4/IPv6 or IPv4 only when roaming internationally
- Turn APN on/off: Grayed out unless there are multiple APNs
- Bearer: Unspecified
Manual network selection
The device detects and registers on wireless networks inside T-Mobile’s calling area, but roaming networks are usually restricted to T-Mobile SIM cards. You can manually select a network only in areas where T-Mobile does not own GSM spectrum.
- Select the Time > Settings.
- In the Network section, select Mobile Data. This option is only available if a SIM card is inserted.
- Turn on Allow mobile data roaming.
- Select a Network.
Turn on / off data roaming
- Select the Time > Settings.
- Under Network, confirm Mobile data is turned on. This option is only available if a SIM card is inserted.
- Select Mobile data.
- Turn on/off Allow mobile data roaming.
Turn on / off mobile data
- Select the Time.
- Select your Network.
- Turn on/off Mobile data. This option is only available if a SIM card is insettings
Delete / forget network
- Select the Time > Settings.
- In the Network section, select Wi-Fi.
- Select the Wi-Fi switch to turn it on.
- Select the desired network, then select Disconnect.
Scan & connect
- Select the Time > Settings.
- In the Network section, select Wi-Fi.
- Select the Wi-Fi switch on, if necessary.
- Select desired Wi-Fi network, enter the password if prompted, then Connect.
Turn on / off
- Select the Time > Settings.
- In the Network section, select Wi-Fi.
- Select the Wi-Fi switch to turn it on or off.
Software Updates & Backup
Master reset from settings menu
A master reset removes all user accounts and resets your Acer Chromebook 511 to factory settings and may delete your personal data on the internal storage, such as downloads, images, and apps. It doesn't delete data stored on the SIM card or SD card.
- Back up data on the internal memory.
- Select the Time > Settings.
- Select Advanced > Reset settings.
- In the Powerwash section, select Reset.
- Read and check the Powerwash disclaimer, select Continue > Restart.
- Wait for the device to reset.
Soft reset with hardware keys
A soft reset is a simulated battery removal. Use a soft reset to power a device off when the screen is frozen or unresponsive and the device has an internal battery that can't be removed. It doesn't cause loss of personal data on the device.
- Select the Time > Settings.
- Select the Shut down icon.
- Wait 3 -5 seconds, use the Power button on the device keyboard to turn your device back on.
Check for software updates
- Select the Time > Settings.
- Select About Chrome OS
- Select Check for updates.
- Wait for the device to check for updates, and download if a new software version is available.
Support & warranty
T-Mobile support
- T-Mobile can help you set up your Acer Chromebook 511's LTE connection and troubleshoot issues around T-Mobile's LTE network and connectivity.
- For any other issues related to your device such as Wi-Fi, Bluetooth, Chrome OS troubleshooting, or hardware and warranty support contact Acer directly for assistance.
Acer support
- Acer can help you with any issues related to your device that do not include T-Mobile's LTE network and connectivity such as Wi-Fi, Bluetooth, Chrome OS troubleshooting, or hardware and warranty support.
- When contacting Acer for warranty support, have your Acer product SNID ready.
- Acer will troubleshoot your device, walk you through the repair process, and in the event it cannot be fixed, will perform the warranty exchange.
Acer contact information
- Phone: 1-866-698-2237
- Hours: Monday – Friday from 6 a.m.– 3 p.m. PT
Was this helpful?